Apache 安全設定
AutoIndex
預設安裝好 Apache 之後,其預設目錄是在 /var/www/html/,如果沒有設定 index.html 的話,那麼就會印出目前目錄裡的所有檔案和目錄,基於安全理由,希望把 AutoIndex 這個取消,如此在別人打入網址後,就會出現 403 的存取權限不足,只有在很“明確”的指出檔案時才可以瀏覽。
關閉 /var/www/html 裡(含子目錄)的自動印出首頁功能
[root@rhel conf]# vi httpd.conf |
重新啟動 httpd
| [root@rhel conf]# service httpd restart Stopping httpd: [ OK ] Starting httpd: [ OK ] [root@rhel conf]# |
虛擬目錄
一般特別重要或有特別作用的目錄,會放在 /var/www/html 之外的其它目錄,比方說現在 /file/download/ 目錄,要在使用者打入 http://www.abc.com.tw/download/ 時,可以自動對應到 /file/download/ 這個目錄,就好像是在 /var/www/html 裡面一樣,這時我們可以使用 alias 的方式做出一個虛擬目錄,使用 Alias 就可以辦得到了。
| [root@rhel conf]# vi httpd.conf _______________________________ Alias /download/ "/file/download/" _______________________________ [root@rhel conf]# service httpd restart Stopping httpd: [ OK ] Starting httpd: [ OK ] [root@rhel conf]# |
注意:Alias 語法為 Alias {target} {source},在 {target} 的描述中(以 download),如果打了一個 "/" 符號,那麼使用者在輸入網址時只能是 http://www.abc.com.tw/download/ 後面就要多帶一個 "/",否則會出現 404 的找不到檔案錯誤。
ServerName 的設定
其實 ServerName 在大部份的情況下可以不設定,但是如果有做重新導向的話,那麼如果這個值不存在,Apache 在啟動時會以 127.0.0.1 來做預設的 ServerName。因此等到有預到重新導向的情況時,就會出現問題。要更正這個問題,只要加入一個 ServerName 的值就可以了。
| [root@rhel conf]# vi httpd.conf _______________________________ ServerName www.abc.com.tw _______________________________ [root@rhel conf]# service httpd restart Stopping httpd: [ OK ] Starting httpd: [ OK ] [root@rhel conf]# |
修改預設目錄
Apache 安裝好之後,預設全是在 /var/www/html 裡面,如果要修改這個目錄,只要修改 DocumentRoot 就可以了。
| [root@rhel conf]# vi httpd.conf _______________________________ DocumentRoot "/project/web" _______________________________ [root@rhel conf]# service httpd restart Stopping httpd: [ OK ] Starting httpd: [ OK ] [root@rhel conf]# |
預設聆聽埠
Apache 安裝之後,會聆聽 80 的標準 http 埠,但是當這台 http 有特別功用時,可能會修改其 Port,要修改 Port,只要修改 Listen 這個值就可以了。
| [root@rhel conf]# vi httpd.conf _______________________________ Listen 8080 _______________________________ [root@rhel conf]# service httpd restart Stopping httpd: [ OK ] Starting httpd: [ OK ] [root@rhel conf]# |
注意:修改預設的聆聽埠,如果在 Firewall 沒有允許連入的情況下會出現連線不到的情形,所以在修改完之後還必需檢查 firewall 是否允許。
保護你的目錄資料 - 密碼驗證
是否想過,某些特別的目錄,只有特別的人才可以進去,但又不想再設定 / 加裝其它的功能,這時候就 Apache 可以提供你一個登入帳號密碼的機制,只有通過的人才可以看到這“特別”的地區。
要編輯的檔案:
- /etc/httpd/conf/httpd.conf (以 Redhat 為列)
- .htaccess (設定檔)
- .htpasswd (帳號 / 密碼檔)
首先,要使用這個認證機制,就要允許可以做 AuthConfig,比方說我要對 http://www.abc.com.tw/secure_data/ 這個 URL 做認證,那麼就需要使用到 AuthConfig。
| [root@rhel conf]# vi /etc/httpd/conf/httpd.conf _______________________________________ # 做 Alias 到 /home/secure_data/ Alias "/secure_data" "/home/secure_data" <Directory "/home/secure_data"> # 允許做 AuthConfig 的設定 AllowOverride AuthConfig </Directory> _______________________________________ #重新啟動 Apache [root@rhel secure_data]# service httpd restart Stopping httpd: [ OK ] Starting httpd: [ OK ] [root@rhel secure_data]# |
接下來,在 /home/secure_data/ 建立一個 .htaccess
| [root@rhel conf]# cd /home/secure_data; touch .htaccess;
vi .htaccess ________________________________________ AuthName "ABC Secure Area" AuthType Basic # 指定帳號密碼檔的位置 AuthUserFile "/home/http_auth_users/.htpasswd" require valid-user ________________________________________ |
最後一步,就是建立一個帳號密碼檔啦!承於本篇的忠旨-安全理由,所以千萬不要把帳號 / 密碼檔這種高度敏感的檔案放到 Public 的區域,尤其是可經由 http、ftp 等方式可取得的管道。本篇我們裝放在 /home/http_auth_user/.htpasswd 裡。
| [root@rhel conf]# mkdir /home/http_auth_users; cd /home/http_auth_users; touch .htpasswd |
檔案建立好了,再來如何建立使用者呢?這時候就必需使用 htpasswd 這個指令來幫我們完成了!
htpasswd 說明:
htpasswd -{option} {passwd_file} {user}
option 可使用:
- -m 使用 MD5 編碼
- -c 建立新的密碼檔
- -b 附帶有 "密碼" (不用再輸入一次密碼)
建立 steven 的帳號密碼:
| [root@mailgw http_auth_users]# htpasswd -m .htpasswd steven New password: Re-type new password: Adding password for user steven [root@mailgw http_auth_users]# |
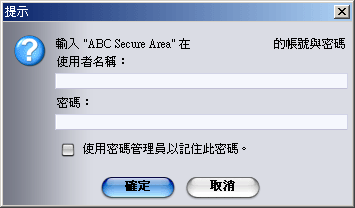
現在開啟您的 Broser,輸入 http://{Your_URL}/{Need_Password_Dir} 本例為 http://www.abc.com.tw/secure_data 時就會出現認證畫面了。

Last modified: 04/01/2005
03/13/2005