在前一篇 Apache 及 Tomcat 的結合 (New window) 的文件中,說明了使用 mod_jk2 把 Apache 與 Tocmat 相結合的實例。最近小弟遇到了主機的擴充案,重新調整了 Apche 的編譯,並且使用新版本的 Tomcat Connectors JK 1.2.26 版本來做兩者之間的溝通。
本篇文章同時也介紹了 Tomcat 6.0 的 MySQL Connection Pool 用法(同時適用於 Tomcat 5.5),實做中也提及如何測試資料庫的連線。
此文章與前一篇Apache 及 Tomcat 的結合 (New window) 並不相容,Tomcat 3 和 Tomcat 5.5 的 Connection Pool 用法已不同;而 mod_jk2 也不再維護,Tomcat 組織以 mod_jk 為主要的發展對像,所以在這些改變之下,決定重新寫此篇文件以供大家參考,若有不明或有誤的地方請大家提出。
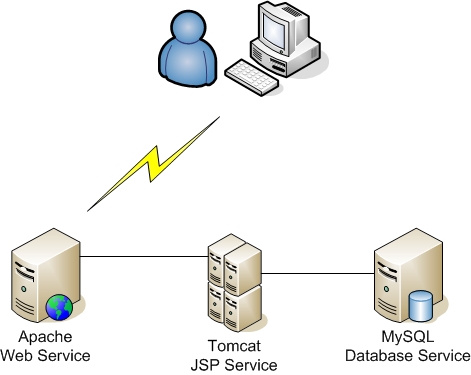
使用者在瀏覽網站時,是對應到 Apache Server,而 JSP 程式則是放在 Tomcat 主機上,當然了資料庫也是獨立的。使用這種架構可分散網頁檔案與程式之間的損失風險。
架構設計之初,應避免把 應用伺服器 與 資料庫伺服器 暴露在網路之中,可以選擇使用內部的虛擬 IP 或防火牆來防止使用者可任意尋找露洞的機會。當然了,安全性的研究不在本次的議題裡,大家可以參閱 查詢相關資料。
以下 IP 為本次的實例分配:
- Apache:192.168.1.205(Apache 2.2.9,Tomcat Connector 1.2.26)
- Tomcat:192.168.1.207(Tomcat 6.0.16)
- MySQL:192.168.1.204(MySQL 5.0.45)
要完成整個 Apache 伺服器的設定,需要下例套件配合:
- Sun Java JDK(Java version 1.6.0_06)
- Apache(httpd 2.2.9)
- Tomcat(tomcat 6.0.16)
- Tomcat Connector(Tomcat Connector 1.2.26)
以下會逐一說明。
下載安裝 Apache
下載 Apache 並解壓縮
最新版本的 Apache 可以到 Apache 官方網站下載:http://httpd.apache.org/
0001 0002 |
root # wget http://apache.cdpa.nsysu.edu.tw/httpd/httpd-2.2.9.tar.bz2 root # tar -jxvf httpd-2.2.9.tar.bz2 |
編譯 httpd
若是採用此方式,在您的環境中必需要有 gcc 編譯器
0001 0002 0003 0004 0005 0006 0007 |
root # cd httpd-2.2.9 root # ./configure --prefix=/usr/local/httpd --with-mpm=worker > --enable-cache --enable-file-cache --enable-disk-cache --enable-mem-cache > --enable-mime-magic --enable-headers --enable-ssl --enable-http --enable-cgi > --enable-rewrite --enable-so --with-suexec-gidmin --with-suexec-logfile root # make root # make install |
以上編譯到安裝的過程可能需要一段時間,結束之後 httpd 會安裝到 /usr/local/httpd 目錄,使用下例指可以啟動 http 服務,即可使用瀏覽器聯結。
0001 |
root # /usr/local/httpd/bin/apachectl start |
查看 httpd 是否有啟動並設定連接埠。
0001 0002 0003 0004 0005 0006 0007 0008 0009 0010 |
root # ps aux | grep httpd; netstat -ntulp | grep :80 root 3021 0.0 0.7 7908 2808 ? Ss 18:55 0:00 /usr/local/httpd/bin/httpd -k start daemon 3022 0.0 0.4 7512 1648 ? S 18:55 0:00 /usr/local/httpd/bin/httpd -k start daemon 3023 0.0 0.7 284680 2904 ? Sl 18:55 0:00 /usr/local/httpd/bin/httpd -k start daemon 3024 0.0 0.7 284680 2856 ? Sl 18:55 0:00 /usr/local/httpd/bin/httpd -k start daemon 3035 0.0 0.7 284680 2904 ? Sl 18:55 0:00 /usr/local/httpd/bin/httpd -k start daemon 3200 0.0 0.7 284680 2836 ? Sl 18:57 0:00 /usr/local/httpd/bin/httpd -k start root 3824 0.0 0.1 1820 484 pts/0 S+ 22:16 0:00 grep httpd tcp 0 0 :::80 :::* LISTEN 3021/httpd |
下載安裝 Tomcat、Sun Java JDK 與 Tomcat Connector
Tomcat 可到 http://tomcat.apache.org/ 下載、Tomcat Connector 可到 http://tomcat.apache.org/download-connectors.cgi 下載,本例中 Java JDK 是採用 Sun 所發展的 Sun Java JDK,可至 http://java.sun.com/javase/downloads/index.jsp 下載 JDK 即可。
下載 Tomcat Connector
下載 Sun Java JDK
下載 Tomcat
搬移檔案至 /opt 目錄
解壓縮檔案
設定與安裝 Tomcat、Tomcat Connector 與 Sun Java JDK
安裝 Sun Java JDK
root # ./jdk-6u6-linux-i586.bin
Sun Microsystems, Inc. Binary Code License Agreement

for the JAVA SE DEVELOPMENT KIT (JDK), VERSION 6

SUN MICROSYSTEMS, INC. ("SUN") IS WILLING TO LICENSE THE
SOFTWARE IDENTIFIED BELOW TO YOU ONLY UPON THE CONDITION
THAT YOU ACCEPT ALL OF THE TERMS CONTAINED IN THIS BINARY
CODE LICENSE AGREEMENT AND SUPPLEMENTAL LICENSE TERMS
(COLLECTIVELY "AGREEMENT"). PLEASE READ THE AGREEMENT
CAREFULLY. BY DOWNLOADING OR INSTALLING THIS SOFTWARE, YOU
ACCEPT THE TERMS OF THE AGREEMENT. INDICATE ACCEPTANCE BY
SELECTING THE "ACCEPT" BUTTON AT THE BOTTOM OF THE
AGREEMENT. IF YOU ARE NOT WILLING TO BE BOUND BY ALL THE
TERMS, SELECT THE "DECLINE" BUTTON AT THE BOTTOM OF THE
AGREEMENT AND THE DOWNLOAD OR INSTALL PROCESS WILL NOT
CONTINUE.

1. DEFINITIONS. "Software" means the identified above in
binary form, any other machine readable materials
(including, but not limited to, libraries, source files,
header files, and data files), any updates or error
corrections provided by Sun, and any user manuals,
programming guides and other documentation provided to you
--More--
~~~~~~~~~~~~~~~~~ignore~~~~~~~~~~~~~~~~~~~~~~~~~~~~~~~~~~~~
THIRDPARTYLICENSEREADME.txt file, the disclaimer of
warranty and limitation of liability provisions in
paragraphs 5 and 6 of the  Binary Code License Agreement
shall apply to all Software in this distribution.

H. Termination for Infringement. Either party may terminate
this Agreement immediately should any Software become, or
in either party's opinion be likely to become, the subject
of a claim of infringement of any intellectual property
right.

I. Installation and Auto-Update.  The Software's
installation and auto-update processes transmit a limited
amount of data to Sun (or its service provider) about those
specific processes to help Sun understand and optimize
them.  Sun does not associate the data with personally
identifiable information.  You can find more information
about the data Sun collects at http://java.com/data/.

For inquiries please contact: Sun Microsystems, Inc., 4150
Network Circle, Santa  Clara, California 95054, U.S.A.

Do you agree to the above license terms? [yes or no]
yes

~~~~~~~~~~~~~~~~~~~ignore~~~~~~~~~~~~~~~~~~~~~``
Java(TM) SE Development Kit 6 successfully installed.

Product Registration is FREE and includes many benefits:
* Notification of new versions, patches, and updates
* Special offers on Sun products, services and training
* Access to early releases and documentation

Product and system data will be collected. If your configuration
supports a browser, the Sun Product Registration form for
the JDK will be presented. If you do not register, none of
this information will be saved. You may also register your
JDK later by opening the register.html file (located in
the JDK installation directory) in a browser.

For more information on what data Registration collects and
how it is managed and used, see:
http://java.sun.com/javase/registration/JDKRegistrationPrivacy.html

Press Enter to continue.....


Done.
安裝 Tomcat
設定環境變數
在安裝 mod_jk 之前,需先設定 tomcat 與 java 的目錄,可在 /etc/profile 設定。
0001 0002 0003 0004 0005 0006 0007 |
JAVA_HOME=/opt/java
CATALINA_HOME=/opt/tomcat
CATALINA_BASE=/opt/tomcat
CLASSPATH=./:${JAVA_HOME}/lib:${JAVA_HOME}/jre/lib/ext:${CATALINA_HOME}/common/lib

export JAVA_HOME CATALINA_HOME CATALINA_BASE CLASSPATH
export PATH=${JAVA_HOME}/bin:${CATALINA_HOME}/bin:${PATH} |
設定完成後可使用 source 指令或 . 指令讓修改的項目生效。
0001 |
root # . /etc/profile |
編譯安裝 mod_jk
完成以上設定後,即可開始編譯 mod_jk。
編譯 mod_jk
0001 0002 0003 |
root # cd tomcat-connectors-1.2.26-src/native/ root # ./configure --with-java-home=/opt/java --with-apxs=/usr/local/httpd/bin/apxs root # make |
安裝 mod_jk.so 至 httpd
0001 |
root # cp apache-2.0/mod_jk.so /usr/local/httpd/lib/ |
以上完成編譯安裝之後,就可以開始設定 apache,讓 mod_jk 生效。apache 的設定檔在 /usr/local/httpd/conf/ 目錄 下。
設定 Apche 與 mod_jk
編輯 httpd.conf
在 httpd.conf 中加入載入 mod_jk 模組與 mod_jk 設定檔項目。
0001 0002 0003 |
LoadModule jk_module lib/mod_jk.so # mod_jk settings Include conf/mod_jk.conf |
在 /usr/local/httpd/conf/ 目錄加入 mod_jk.conf
0001 |
root # touch mod_jk.conf |
在 mod_jk.conf 加入以下內容
0001 0002 0003 0004 0005 0006 0007 0008 0009 0010 0011 0012 0013 0014 0015 |
#setup the workers.properties file path, default prefix path is httpd's home (/usr/local/httpd)
JkWorkersFile conf/workers.properties
JkLogFile  /var/log/jk.log
JkShmFile  /var/log/jk-runtime-status
JkLogLevel error
JkLogStampFormat "[%a %b %d %H:%M:%S %Y] "
JkOptions +ForwardKeySize +ForwardURICompat -ForwardDirectories
JkRequestLogFormat "%w %V %T"

# Sample JkMounts.  Replace these with the paths you would
# like to mount from your JSP server.
# syntax: JkMount ${URL_DIR}/*.jsp worker_name
JkMount /project1/*.jsp jsp-ap207
JkMount /project2/*.jsp jsp-ap207
JkMount /project3/*.jsp jsp-ap207 |
增加 conf/workers.properties 檔案
0001 |
root # touch /usr/local/httpd/conf/workers.properties |
設定 workers.properties
0001 0002 0003 0004 0005 0006 0007 0008 0009 0010 0011 |
# BEGIN workers.properties # setting tomcat_home and java_home workers.tomcat_home=/opt/tomcat workers.java_home=/opt/java # worker.list defined worker_name, used by mod_jk.conf worker.list=jsp-ap207 worker.jsp-ap207.port=8009 worker.jsp-ap207.host=192.168.1.207 worker.jsp-ap207.type=ajp13 worker.jsp-ap207.lbfactor=1 |
重新啟動 Apache
經過了以上步驟後,在 Apache 的部份可說是已完成設定(當然細項目份還需要調整)。現在可重新啟動 Apache。
0001 0002 |
root # /usr/local/httpd/bin/apachectl stop root # /usr/local/httpd/bin/apachectl start |
要完成整個 Tomcat 的設定,需要以下套件配合
- Tomcat(http://tomcat.apache.org/)
- Java JDK(http://java.sun.com/javase/downloads/index.jsp)
- jaf(http://java.sun.com/javase/technologies/desktop/javabeans/jaf/downloads/index.html)
- javamail(http://java.sun.com/products/javamail/downloads/index.html)
下載與安裝 Tomcat、Java JDK、jaf 與 javamail
下載 Tomcat
下載 Sun Java JDK
下載 jaf
下載 javamail
解壓縮檔案
root # tar -zxvf apache-tomcat-6.0.16.tar.gz ;unzip jaf-1_0_2-upd2.zip ; unzip javamail-1_4_1.zip; chmod +x jdk-6u6-linux-i586.bin
root # ./jdk-6u6-linux-i586.bin
Sun Microsystems, Inc. Binary Code License Agreement

for the JAVA SE DEVELOPMENT KIT (JDK), VERSION 6

SUN MICROSYSTEMS, INC. ("SUN") IS WILLING TO LICENSE THE
SOFTWARE IDENTIFIED BELOW TO YOU ONLY UPON THE CONDITION
THAT YOU ACCEPT ALL OF THE TERMS CONTAINED IN THIS BINARY
CODE LICENSE AGREEMENT AND SUPPLEMENTAL LICENSE TERMS
(COLLECTIVELY "AGREEMENT"). PLEASE READ THE AGREEMENT
CAREFULLY. BY DOWNLOADING OR INSTALLING THIS SOFTWARE, YOU
ACCEPT THE TERMS OF THE AGREEMENT. INDICATE ACCEPTANCE BY
SELECTING THE "ACCEPT" BUTTON AT THE BOTTOM OF THE
AGREEMENT. IF YOU ARE NOT WILLING TO BE BOUND BY ALL THE
TERMS, SELECT THE "DECLINE" BUTTON AT THE BOTTOM OF THE
AGREEMENT AND THE DOWNLOAD OR INSTALL PROCESS WILL NOT
CONTINUE.

1. DEFINITIONS. "Software" means the identified above in
binary form, any other machine readable materials
(including, but not limited to, libraries, source files,
header files, and data files), any updates or error
corrections provided by Sun, and any user manuals,
programming guides and other documentation provided to you
--More--
~~~~~~~~~~~~~~~~~ignore~~~~~~~~~~~~~~~~~~~~~~~~~~~~~~~~~~~~
THIRDPARTYLICENSEREADME.txt file, the disclaimer of
warranty and limitation of liability provisions in
paragraphs 5 and 6 of the  Binary Code License Agreement
shall apply to all Software in this distribution.

H. Termination for Infringement. Either party may terminate
this Agreement immediately should any Software become, or
in either party's opinion be likely to become, the subject
of a claim of infringement of any intellectual property
right.

I. Installation and Auto-Update.  The Software's
installation and auto-update processes transmit a limited
amount of data to Sun (or its service provider) about those
specific processes to help Sun understand and optimize
them.  Sun does not associate the data with personally
identifiable information.  You can find more information
about the data Sun collects at http://java.com/data/.

For inquiries please contact: Sun Microsystems, Inc., 4150
Network Circle, Santa  Clara, California 95054, U.S.A.

Do you agree to the above license terms? [yes or no]
yes

~~~~~~~~~~~~~~~~~~~ignore~~~~~~~~~~~~~~~~~~~~~``
Java(TM) SE Development Kit 6 successfully installed.

Product Registration is FREE and includes many benefits:
* Notification of new versions, patches, and updates
* Special offers on Sun products, services and training
* Access to early releases and documentation

Product and system data will be collected. If your configuration
supports a browser, the Sun Product Registration form for
the JDK will be presented. If you do not register, none of
this information will be saved. You may also register your
JDK later by opening the register.html file (located in
the JDK installation directory) in a browser.

For more information on what data Registration collects and
how it is managed and used, see:
http://java.sun.com/javase/registration/JDKRegistrationPrivacy.html

Press Enter to continue.....


Done.
將檔案移動到 /opt 目錄
以上過程會把 Tomcat、jaf、javamail 與 Sun Java JDK 安裝完成,現在必需設定系統變數才可使 tomcat 順利啟動。
編輯 /etc/profile 檔案,並加入以下設定。
0001 0002 0003 0004 0005 0006 0007 |
JAVA_HOME=/opt/java
CATALINA_HOME=/opt/tomcat
CATALINA_BASE=/opt/tomcat
CLASSPATH=./:${JAVA_HOME}/lib:${JAVA_HOME}/jre/lib/ext:${CATALINA_HOME}/common/lib:/opt/javamail/mail.jar:/opt/jaf/activation.jar

export JAVA_HOME CATALINA_HOME CATALINA_BASE CLASSPATH
export PATH=${JAVA_HOME}/bin:${CATALINA_HOME}/bin:${PATH} |
完整的設定 /etc/profile 之後執行下列指令可立即生效。
0001 |
root # . /etc/profile |
完成以上項目後,即可開始設定 tomcat,讓 tomcat 接受處理 Apache 的請求。
設定 tomcat
以下說明的 tomcat 設定檔均指 /opt/tomcat/conf/server.xml 檔案,若您的 tomcat 安裝在不同路徑請自行更改。
處理 Apache 所指示的檔案,需要 tomcat 的配合,預設 tomcat 開啟 8009 連接埠的請求,因此只需要設定虛擬目錄即可。
設定 http://192.168.1.205/project1 目錄,設定時先先定議一個虛擬網站,再設定虛擬目錄,虛擬網站由 <Host></Host> 的 xml 標籤所包含,而目錄是以 <Context></Context> 所包含,其格式如下:
0001 0002 0003 0004 0005 0006 |
<Engine>
    <Host attrs ...>
        <Context attrs ...>
        </Context>
    </Host>
</Engine> |
server.xml 修改過後的樣式如下:
0001 0002 0003 0004 0005 |
      <Host name="192.168.1.205" debug="0" appBase="/default" unpackWARs="true" autoDeploy="true">
         <Context path="/project1" docBase="/projects/project1"
                  debug="5" reloadable="true" crossContext="true">
         </Context>
</Host> |
以上 <Context> 標籤裡的 path 屬性是指 URL 的路徑,實際對應的目錄為 /projects/project1/。設定完成後,請先行建立 /projects/project1/ 目錄。
0001 |
root # mkdir -p "/projects/project1"; cd /projects/project1 |
啟動 tomcat 服務。
0001 0002 0003 0004 0005 |
root # /opt/tomcat/bin/startup.sh Using CATALINA_BASE: /opt/tomcat Using CATALINA_HOME: /opt/tomcat Using CATALINA_TMPDIR: /opt/tomcat/temp Using JRE_HOME: /opt/java |
測試
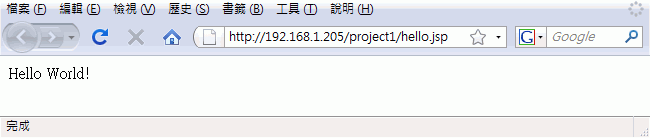
完成了以上 Apache 與 Tomcat 的設定,現在可進行測試,請先在 Tomcat 主機上的 /projects/project1/ 建立一個 hello.jsp 程式,內容如下。
0001 0002 0003 0004 0005 0006 |
<%@ page contentType="text/html;charset=big5" %> <% String str1="Hello World!"; out.println(str1); %> |
hello.jsp 程式可點選 此處 下載。
現在,開啟您的瀏覽器,輸入 http://192.168.1.205/project1/hello.jsp 網址。
MySQL 設定的方式很簡單,基乎不需要任何的設定,只要確定可以連線到資料庫即可。
在 Tomcat 伺服器上,測試 MySQL 連線方如下:
01 02 03 04 05 06 07 08 09 |
steven $ mysql -u steven -p -h 192.168.1.204 Enter password: Welcome to the MySQL monitor. Commands end with ; or g. Your MySQL connection id is 443 to server version: 5.0.22-log Type 'help;' or 'h' for help. Type 'c' to clear the buffer. mysql> |
以上若可順利連線到 MySQL 主機則表示成功。
若是連線失敗,請檢查防火牆設定與 MySQL 是否有啟動。
安裝 MySQL Connection/J
要使 tomcat 與 MySQL 可以做資源聯結,需要有 MySQL Connector/J 的配合才行,可到 MySQL 網站(http://dev.mysql.com/downloads/connector/j/)中下載。
本文編寫時,最新版本的 Connector/J 為 5.1.6 版。
01 02 |
root # lynx 'http://dev.mysql.com/get/Downloads/Connector-J/mysql-connector-java-5.1.6.tar.gz/from/http://mysql.ntu.edu.tw/' root # tar -zxvf mysql-connector-java-5.1.6.tar.gz |
下載完後,把 mysql-connector-java-5.1.6-bin.jar 複製到 /opt/tomcat/common/lib/ 裡即可
01 |
root # cp mysql-connector-java-5.1.6/mysql-connector-java-5.1.6-bin.jar /opt/tomcat/common/lib/ |
編輯 Tomcat 設定檔
設定 Tomcat Database Connection Pool 的方式很簡單,只要在目錄裡加上 <Resource></Resource> 標籤即可,使用的方式如下:
01 02 03 04 05 06 07 |
<Engine>
    <Host attrs ...>
        <Context attrs ...>
             <Resource attrs ... />
        </Context>
    </Host>
</Engine> |
把 <Resource> 標籤放在 <Context> 裡,則此目錄的程式都可以引用在此設定的資料庫連線資源,以下為實際修改方式:
01 02 03 04 05 06 07 08 09 10 |
      <Host name="192.168.1.205" debug="0" appBase="/default" unpackWARs="true" autoDeploy="true">

         <Context path="/project1" docBase="/projects/project1"
                  debug="5" reloadable="true" crossContext="true">
              <Resource name="jdbc/project1" auth="Container" type="javax.sql.DataSource"
                        maxActive="100" maxIdle="30" maxWait="10000"
                        username="steven" password="pass" driverClassName="com.mysql.jdbc.Driver"
                        url="jdbc:mysql://192.168.1.204:3306/project1?autoReconnect=true"/>
         </Context>
</Host> |
在 <Resource> 標籤裡的 name 是指資料庫資源名稱,username 與 password 為連線的帳號與密碼,而 url 裡設定了所要連結的資料庫主機與資料庫名稱。當然您必需把 project1 這個資料庫先建立起來並設定 steven 帳號可以存取才行。
注意:您可以同時設定多個 Resource 資源,只要 name 不重複即可。
設定完成後,需重新啟動 tomcat 伺服器。
JDBC 連線設定的注意事項:
若您在之前使用的 MySQL Connector/J 是 3.x 的話,那麼在 JSP 顯示資料庫欄位值的方式可能會使用 getColumnName() 來取得資料資料。然而這個用法在 MySQL Connector/J 5.0 以上已經被改變了,需使用 getColumnLabel() 的方式來取得資料。
若您想要在不修改程式的情況下又要保持相容性,那麼可以使用 useOldAliasMetadataBehavior 這個參數讓 getColumnName() 方法也可以繼續使用,使用的方式也很簡單,設定方法如下:
01 02 03 04 05 06 07 08 09 |
<Host name="192.168.1.205" debug="0" appBase="/default" unpackWARs="true" autoDeploy="true">
<Context path="/project1" docBase="/projects/project1"
debug="5" reloadable="true" crossContext="true">
<Resource name="jdbc/project1" auth="Container" type="javax.sql.DataSource"
maxActive="100" maxIdle="30" maxWait="10000"
username="steven" password="pass" driverClassName="com.mysql.jdbc.Driver"
url="jdbc:mysql://192.168.1.204:3306/project1?autoReconnect=true&useOldAliasMetadataBehavior=true"/>
</Context>
</Host> |
以上範例中,需要加入的參數為 useOldAliasMetadataBehavior=true,中間需要使用 & 符號相隔,但在 XML 格式中不可直接使用 & 符號,所以需要使用 & 來分隔。
useOldAliasMetadataBehavior 在 MySQL Connector/J 5.0 預設為 true,但在 MySQL Connector/J 5.1 時預設為 false,所以必需重新開啟才行。
更多有關 MySQL Connector/J 的說明,可到 http://dev.mysql.com/doc/refman/5.1/en/connector-j-reference-configuration-properties.html 查看。
若您在執行程式式發現 MySQL 有關時間的問題時,可使用 zeroDateTimeBehavior 參數來解決問題,設定方法如下:
0001 0002 0003 0004 0005 0006 0007 0008 0009 |
<Host name="192.168.1.205" debug="0" appBase="/default" unpackWARs="true" autoDeploy="true">
<Context path="/project1" docBase="/projects/project1"
debug="5" reloadable="true" crossContext="true">
<Resource name="jdbc/project1" auth="Container" type="javax.sql.DataSource"
maxActive="100" maxIdle="30" maxWait="10000"
username="steven" password="pass" driverClassName="com.mysql.jdbc.Driver"
url="jdbc:mysql://192.168.1.204:3306/project1?autoReconnect=true&useOldAliasMetadataBehavior=true&zeroDateTimeBehavior=convertToNull"/>
</Context>
</Host> |
設定完成後,需重新啟動 Tomcat 讓設定生效
閉關 tomcat
0001 0002 0003 0004 0005 |
root # /opt/tomcat/bin/shutdown.sh Using CATALINA_BASE: /opt/tomcat Using CATALINA_HOME: /opt/tomcat Using CATALINA_TMPDIR: /opt/tomcat/temp Using JRE_HOME: /opt/java |
啟動 tomcat
0001 0002 0003 0004 0005 |
root # /opt/tomcat/bin/startup.sh Using CATALINA_BASE: /opt/tomcat Using CATALINA_HOME: /opt/tomcat Using CATALINA_TMPDIR: /opt/tomcat/temp Using JRE_HOME: /opt/java |
測試 JSP 連線
請在 /projects/project1/ 裡建立 db_test.jsp,而 db_test.jsp 的內容如下:
01 02 03 04 05 06 07 08 09 10 11 12 13 14 15 16 17 18 19 20 21 22 23 24 25 26 27 28 |
<%@ page import="java.sql.*"%>
<%@ page import="javax.sql.*"%>
<%@ page import="javax.naming.*"%>
<%@ page session="false" %>
<html>
<head>
<meta http-equiv="content-type" content="text/html; charset=big5">
<title>Test of mysql connection pool</title>
</head>
<body>
<%
out.print("start<br/>");
try{
Context initctx = new InitialContext();
Context ctx = (Context) initctx.lookup("java:comp/env");
Object obj = (Object) ctx.lookup("jdbc/project1");
javax.sql.DataSource ds = (javax.sql.DataSource)obj;
Connection conn = ds.getConnection();
out.print("mysql connection pool runs perfectly!");
conn.close();
}
catch(Exception ex){
out.print(ex.getMessage());
ex.printStackTrace();
}
%>
</body>
</html> |
請注意,以上 jsp 裡 ctx.lookup 裡所指定的 jdbc 為 tomcat 設定檔裡的 <Resource> 名稱,與 name 屬性相對應。
以上 db_test.jsp 可以點選 此處 下載。
開啟瀏覽器,輸入測試程式的網址,若是連線成功則會出現 mysql connection pool runs perfectly! 字樣。
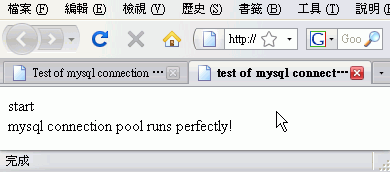
若看到此訊息的話,那麼恭禧您已經完成了本次的整合,接來您可以對伺服器與應用程式開始測試或調效。若您在過程中遇到了問題,歡迎提出來研究,或是在各套件的網站上都有詳細的介紹與方法。
06/27/2008