當您辛苦建立伺服器後,當然會想辦法能夠監控主機的健康狀況。使用 SNMP 可以提供主機的各種資訊,透過定時取回數值,也可以了解伺服器連線情況。本文章說明如何安裝 SNMP 套件並配合 MRTG 使為網頁圖表示的主機監控,讓系統管理人員可以更快速了解伺服的使用狀況。
所需套件
- net-snmp
- mrtg
- GD Library
- perl
參考資料
安裝設定 SNMP
安裝 SNMP
網頁上有多篇文章撰寫了如何安裝與設定 SNMP 套件,若在您的環境之下已確定安裝好 net-snmp,則可套過此一節。本節介紹如何安裝 SNMP 套件,在本文撰寫之時,最新版本的 net-snmp 為 5.4.2。
net-snmp 可由 http://www.net-snmp.org/download.html 下載。
下載並安解開 net-snmp
0001 0002 0003 |
root # cd /opt; wget http://nchc.dl.sourceforge.net/sourceforge/net-snmp/net-snmp-5.4.2.tar.gz root # tar -zxvf net-snmp-5.4.2.tar.gz root # cd net-snmp-5.4.2 |
設定 net-snmp 安裝路徑
0001 |
root # ./configure --prefix=/usr/local/net-snmp |
在建立 Makefile 後,會提示您一些在安裝時所需要的資訊,請在下列粗體字的地方依需求修改。
0001 0002 0003 0004 0005 0006 0007 0008 0009 0010 0011 0012 0013 0014 0015 0016 0017 0018 0019 0020 0021 0022 0023 0024 0025 0026 0027 0028 0029 0030 0031 0032 0033 0034 0035 0036 0037 0038 0039 0040 0041 0042 0043 0044 0045 0046 0047 0048 0049 0050 0051 0052 0053 0054 0055 0056 0057 0058 0059 0060 0061 0062 0063 0064 0065 0066 0067 0068 0069 0070 0071 0072 0073 0074 0075 0076 0077 0078 0079 0080 0081 0082 0083 0084 0085 0086 0087 0088 0089 0090 0091 0092 0093 0094 0095 0096 0097 0098 0099 0100 0101 0102 0103 0104 0105 0106 0107 0108 0109 0110 0111 |
         ************** Configuration Section **************

        You are about to be prompted with a series of questions.  Answer
them carefully, as they determine how the SNMP agent and related
applications are to function.

        After the configure script finishes, you can browse the newly
created net-snmp-config.h file for further - less important - parameters to
modify.  Be careful if you re-run configure though, since net-snmp-config.h
will be overwritten.

-Press return to continue- 按 [Enter]

yes
checking Default version of SNMP to use...


*** Default SNMP Version:

        Starting with Net-SNMP 5.0, you can choose the default version of
the SNMP protocol to use when no version is given explicitly on the
command line, or via an 'snmp.conf' file.  In the past this was set to
SNMPv1, but you can use this to switch to SNMPv3 if desired.  SNMPv3
will provide a more secure management environment (and thus you're
encouraged to switch to SNMPv3), but may break existing scripts that
rely on the old behaviour.  (Though such scripts will probably need to
be changed to use the '-c' community flag anyway, as the SNMPv1
command line usage has changed as well.).
   At this prompt you can select "1", "2" (for SNMPv2c), or "3" as
the default version for the command tools (snmpget, ...) to use.  This
can always be overridden at runtime using the -v flag to the tools, or
by using the "defVersion" token in your snmp.conf file.
   Providing the --with-default-snmp-version="x" parameter to ./configure
will avoid this prompt.

Default version of SNMP to use (3): 按 [Enter]
setting Default version of SNMP to use to...  3
checking System Contact Information...


*** System Contact Information:

        Describes who should be contacted about the host the agent is
running on.  This information is available in the MIB-II tree.  This
can also be over-ridden using the "syscontact" syntax in the agent's
configuration files.
  Providing the --with-sys-contact="contact" parameter to ./configure
will avoid this prompt.

System Contact Information (root@): admin@example.com
setting System Contact Information to...  admin@example.com
checking System Location...


*** System Location:

        Describes the location of the system.  This information is
available in the MIB-II tree.  this can also be over-ridden using the
"syslocation" syntax in the agent's configuration files.
  Providing the --with-sys-location="location" parameter to ./configure
will avoid this prompt.

System Location (Unknown): 按 [Enter]


*** Logfile location:

        Enter the default location for the snmpd agent to dump
information & errors to.  If not defined (enter the keyword "none"
at the prompt below) the agent will use stdout and stderr instead.
(Note: This value can be over-ridden using command line options.)
  Providing the --with-logfile="path" parameter to ./configure
will avoid this prompt.

Location to write logfile (/var/log/snmpd.log): /usr/local/net-snmp/var/log/snmpd.log
setting Location to write logfile to...  /usr/local/net-snmp/var/log/snmpd.log
checking Location to write persistent information...


*** snmpd persistent storage location:

        Enter a directory for the SNMP library to store persistent
data in the form of a configuration file.  This default location is
different than the old default location (which was for ucd-snmp).  If
you stay with the new path, I'll ask you in a second if you wish to
copy your files over to the new location (once only).  If you pick
some other path than the default, you'll have to copy them yourself.
There is nothing wrong with picking the old path (/var/ucd-snmp) if
you'd rather.
  Providing the --with-persistent-directory="path" parameter to
./configure will avoid this prompt.

Location to write persistent information (/var/net-snmp): /usr/local/net-snmp/var/net-snmp

---------------------------------------------------------
            Net-SNMP configuration summary:
---------------------------------------------------------

  SNMP Versions Supported:    1 2c 3
  Net-SNMP Version:           5.4.2
  Building for:               linux
  Network transport support:  Callback Unix TCP UDP
  SNMPv3 Security Modules:     usm
  Agent MIB code:             default_modules =>  snmpv3mibs mibII ucd_snmp notification notification-log-mib target agent_mibs agentx disman/event disman/schedule utilities host
  Embedded Perl support:      enabled
  SNMP Perl modules:          building -- embeddable
  SNMP Python modules:        disabled
  Authentication support:     MD5 SHA1
  Encryption support:         DES AES

--------------------------------------------------------- |
安裝完成後,執行安裝
0001 0002 0003 |
root # make root # make install root # cd /usr/local/net-snmp/ |
設定 SNMP
若您使用上序方法安裝 net-snmp,那麼您的 net-snmp 將被安裝在 /usr/local/net-snmp 目錄之下。
snmp 在啟動之時,需要參考 snmpd.conf 檔案,然而 snmpd.conf 卻是大部份設定上最難以著手的地方,所幸 net-snmp 套件提供了 snmpconf 工具,只要填入所需資訊即可設定。
0001 |
root # ./bin/snmpconf -i |
以下為 snmpconf 的設定過程,請依需求設定即可。設定完成後,snmpconf 會自動把設定檔輸出到正確的位置。
0001 0002 0003 0004 0005 0006 0007 0008 0009 0010 0011 0012 0013 0014 0015 0016 0017 0018 0019 0020 0021 0022 0023 0024 0025 0026 0027 0028 0029 0030 0031 0032 0033 0034 0035 0036 0037 0038 0039 0040 0041 0042 0043 0044 0045 0046 0047 0048 0049 0050 0051 0052 0053 0054 0055 0056 0057 0058 0059 0060 0061 0062 0063 0064 0065 0066 0067 0068 0069 0070 0071 0072 0073 0074 0075 0076 0077 0078 0079 0080 0081 0082 0083 0084 0085 0086 0087 0088 0089 0090 0091 0092 0093 0094 0095 0096 0097 0098 0099 0100 0101 0102 0103 0104 0105 0106 0107 0108 0109 0110 0111 0112 0113 0114 0115 0116 0117 0118 |
I can create the following types of configuration files for you.
Select the file type you wish to create:
(you can create more than one as you run this program)

   1:  snmpd.conf
   2:  snmptrapd.conf
   3:  snmp.conf

Other options: quit

Select File: 1
The configuration information which can be put into snmpd.conf is divided
into sections.  Select a configuration section for snmpd.conf
that you wish to create:

   1:  System Information Setup
   2:  Monitor Various Aspects of the Running Host
   3:  Extending the Agent
   4:  Agent Operating Mode
   5:  Trap Destinations
   6:  Access Control Setup

Other options: finished

Select section: 6

Section: Access Control Setup
Description:
  This section defines who is allowed to talk to your running
  snmp agent.

Select from:

   1:  a SNMPv3 read-write user
   2:  a SNMPv3 read-only user
   3:  a SNMPv1/SNMPv2c read-only access community name
   4:  a SNMPv1/SNMPv2c read-write access community name

Other options: finished, list

Select section: 3

Configuring: rocommunity
Description:
  a SNMPv1/SNMPv2c read-only access community name
    arguments:  community [default|hostname|network/bits] [oid]

The community name to add read-only access for: mail

The hostname or network address to accept this community name from [RETURN for all]:

The OID that this community should be restricted to [RETURN for no-restriction]:

Finished Output: rocommunity  mail

Section: Access Control Setup
Description:
  This section defines who is allowed to talk to your running
  snmp agent.

Select from:

   1:  a SNMPv3 read-write user
   2:  a SNMPv3 read-only user
   3:  a SNMPv1/SNMPv2c read-only access community name
   4:  a SNMPv1/SNMPv2c read-write access community name

Other options: finished, list

Select section: finished


The configuration information which can be put into snmpd.conf is divided
into sections.  Select a configuration section for snmpd.conf
that you wish to create:

   1:  System Information Setup
   2:  Monitor Various Aspects of the Running Host
   3:  Extending the Agent
   4:  Agent Operating Mode
   5:  Trap Destinations
   6:  Access Control Setup

Other options: finished

Select section: finished

I can create the following types of configuration files for you.
Select the file type you wish to create:
(you can create more than one as you run this program)

   1:  snmpd.conf
   2:  snmptrapd.conf
   3:  snmp.conf

Other options: quit

Select File: quit

The following files were created:

snmpd.conf installed in /usr/local/net-snmp/share/snmp |
設定完成後,執行 snmpd 即可啟動。
0001 0002 0003 |
root # /usr/local/net-snmp/sbin/snmpd root # netstat -ntulp | grep :161 udp 0 0 0.0.0.0:161 0.0.0.0:* 27257/snmpd |
snmpd 預設會開啟 UDP 161 連接埠,若您的偵測器是由外部所連線,請注意防火牆設定。
接下來,可使用 snmpwalk 開始對 snmp 要求取出偵測字串,語法如下:
snmpwalk -v [version] -c [access_id] [IP | host] [OID]
若不指定 OID 的話,那麼就會列出所有的資訊,洋洋灑灑的一大串,以下為輸出的一部份,其它的就先省略。
0001 0002 0003 0004 0005 0006 0007 0008 0009 0010 0011 0012 0013 0014 0015 |
root # /usr/local/net-snmp/bin/snmpwalk -v 2c -c mail 192.168.1.131 SNMPv2-MIB::sysDescr.0 = STRING: Linux ms1.test.com 2.6.18-92.1.13.el5 #1 SMP Wed Sep 24 19:33:52 EDT 2008 i686 SNMPv2-MIB::sysObjectID.0 = OID: NET-SNMP-MIB::netSnmpAgentOIDs.10 DISMAN-EVENT-MIB::sysUpTimeInstance = Timeticks: (13401) 0:02:14.01 SNMPv2-MIB::sysContact.0 = STRING: admin@example.com SNMPv2-MIB::sysName.0 = STRING: ms1.test.com SNMPv2-MIB::sysLocation.0 = STRING: Unknown SNMPv2-MIB::sysORLastChange.0 = Timeticks: (1) 0:00:00.01 SNMPv2-MIB::sysORID.1 = OID: SNMP-FRAMEWORK-MIB::snmpFrameworkMIBCompliance SNMPv2-MIB::sysORID.2 = OID: SNMP-MPD-MIB::snmpMPDCompliance SNMPv2-MIB::sysORID.3 = OID: SNMP-USER-BASED-SM-MIB::usmMIBCompliance SNMPv2-MIB::sysORID.4 = OID: SNMPv2-MIB::snmpMIB SNMPv2-MIB::sysORID.5 = OID: TCP-MIB::tcpMIB ~ ~ root # |
廣 告 |
安裝設定 MRTG
MRTG 套件可將 SNMP 所輸出的數值圖形化,透過圖形化的介面,管理者可以輕易的了解主機使用的情況。
MRTG 可在 http://oss.oetiker.ch/mrtg/pub/?M=D 下載,在本文撰寫的同時,最新版本為 2.16.2,您有可能取得不同版本的 MRTG。
以下為下載 MRTG,解壓縮並安裝的過程,安裝完成之後,MRTG 會被安裝在 /usr/loca/mrtg 目錄。
0001 0002 0003 0004 0005 0006 |
root # cd /opt; wget http://mrtg.cs.pu.edu.tw/pub/mrtg.tar.gz root # tar -zxvf mrtg.tar.gz root # cd mrtg-2.16.2/ root # ./configure --prefix=/usr/local/mrtg root # make root # make install |
若您在設定時發生需要 GD 函式庫的訊息時,可試著安裝 GD 開發套件,以下為 CentOS 5 使用 yum 工具的安裝方式。安裝完成後,請再重新執行上述步驟。
0001 |
root # yum install gd-devel |
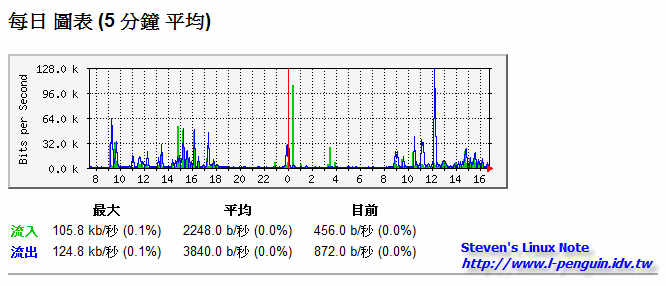
偵測網路流量
MRTG 最主要的功能之一,就是針對網路流量做圖形的繪製,以便輸出成 HTML 網頁。
首先,需使用 cfgmaker 輸出網路資訊設定檔,範例中會把設定檔輸出到 /application/apps/traffic/mrtg 目錄上,其使用的語法如下:
cfgmaker --output=[OUT_PUT_CNF_FILE] [access_id]@[IP | host]
0001 |
root # /usr/local/mrtg/bin/cfgmaker --output=/application/apps/traffic/mrtg/192.168.1.131-net.mrtg.cfg mail@192.168.1.131 |
輸出之後,使用 vi 編輯所輸出的檔案,修正 HTML 網頁與圖像所要輸出的位置。
0001 |
root # cd /application/apps/traffic/mrtg/; vi 192.168.1.131-net.mrtg.cfg |
修改 WordDir 項目,本例中將會把 HTML 與圖片輸出到 /application/apps/traffic/html 目錄。
0001 0002 0003 |
# for UNIX # WorkDir: /home/http/mrtg WorkDir: /application/apps/traffic/html |
設定完成後,可使用 mrtg 指令做繪圖,以下為 mrtg 語法:
mrtg [CNF_FILE]
mrtg 執行時會參考先前所紀錄的數值,因為第一次沒有可以參考的數值,所以會有錯誤參生,此時請再重覆執行二、三次之後,錯誤就不會出現了。
0001 0002 0003 0004 0005 0006 0007 |
root # LANG=C /usr/local/mrtg/bin/mrtg /application/apps/traffic/mrtg/192.168.1.131-net.mrtg.cfg 2008-10-20 23:58:19, Rateup WARNING: /usr/local/mrtg/bin/rateup could not read the primary log file for 192.168.1.131_2 2008-10-20 23:58:19, Rateup WARNING: /usr/local/mrtg/bin/rateup The backup log file for 192.168.1.131_2 was invalid as well 2008-10-20 23:58:19, Rateup WARNING: /usr/local/mrtg/bin/rateup Can't remove 192.168.1.131_2.old updating log file 2008-10-20 23:58:19, Rateup WARNING: /usr/local/mrtg/bin/rateup Can't rename 192.168.1.131_2.log to 192.168.1.131_2.old updating log file root # LANG=C /usr/local/mrtg/bin/mrtg /application/apps/traffic/mrtg/192.168.1.131-net.mrtg.cfg 2008-10-20 23:58:20, Rateup WARNING: /usr/local/mrtg/bin/rateup Can't remove 192.168.1.131_2.old updating log file |
MRTG 適合每五分鐘執行一次,確保蒐集資訊,可以在系統排程裡增加 MRTG 的執行項目,如此即可每五分鐘重繪圖形與網頁提供查看。
要在排程增加項目,請執行 crontab -e 設定
0001 |
root # crontab -e |
以下為設定每五分鐘執行一次,並不輸出結果。
0001 |
*/5 * * * * (LANG=C /usr/local/mrtg/bin/mrtg /application/apps/traffic/mrtg/192.168.1.131-net.mrtg.cfg) > /dev/null 2>&1 |
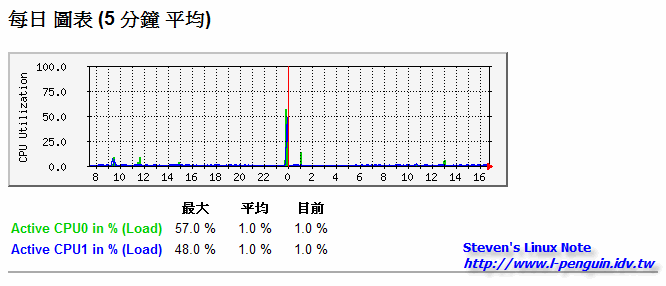
監控 CPU
網路上有提供監控 CPU 的 script,在偵測時使用 mrtg 向 script 取回數值後再繪製圖片,再以下的範例,我們使用 mrtg 直接向 SNMP 要求數值,如此可避免使用 script 取回資訊的過程。
使用 snmpwalk 查看 CPU 資訊:
在 net-snmp 所提供的 MIB 項目裡,CPU 的偵測是列於 hrProcessorLoad 項目裡,本例中因為有兩顆 CPU,所以會輸出兩個項目,分別為 CPU 0 與 CPU1。
0001 0002 0003 |
root # /usr/local/net-snmp/bin/snmpwalk -v 2c -c mail 192.168.1.131 hrProcessorLoad HOST-RESOURCES-MIB::hrProcessorLoad.768 = INTEGER: 8 HOST-RESOURCES-MIB::hrProcessorLoad.769 = INTEGER: 2 |
接下來手動建立設定檔案
0001 |
root # vi /application/apps/traffic/mrtg/192.168.1.131-cpu.mrtg.cfg |
以下設定檔案您可以直接複製起來使用,但是需要注意以下粗體字的地方,修改成符合您環境的設定。
偵測 CPU 時,需先行載入 snmp MIB 項目才可正確查尋。
0001 0002 0003 0004 0005 0006 0007 0008 0009 0010 0011 0012 0013 0014 0015 0016 0017 0018 0019 0020 0021 0022 0023 0024 0025 0026 0027 0028 0029 0030 0031 0032 0033 0034 |
# Created by # /usr/local/mrtg/bin/cfgmaker mail@192.168.1.131 ### Global Config Options # for UNIX # WorkDir: /home/http/mrtg WorkDir: /application/apps/traffic/html # or for NT # WorkDir: c:mrtgdata ### Global Defaults LoadMIBs: /usr/local/net-snmp/share/snmp/mibs/HOST-RESOURCES-MIB.txt Target[192.168.1.131_cpu]: hrProcessorLoad.768&hrProcessorLoad.769:mail@192.168.1.131 RouterUptime[192.168.1.131_cpu]: mail@192.168.1.131 Title[192.168.1.131_cpu]: CPU Load MaxBytes[192.168.1.131_cpu]: 100 Language: big5 WithPeak[_]: wmy Unscaled[192.168.1.131_cpu]: ymwd Options[192.168.1.131_cpu]: growright,nopercent,gauge ShortLegend[192.168.1.131_cpu]: % PageTop[192.168.1.131_cpu]: <H1>192.168.1.131 CPU Load (CPU0 & CPU1)</H1> YLegend[192.168.1.131_cpu]: CPU Utilization Legend1[192.168.1.131_cpu]: Active CPU0 in % (Load) Legend2[192.168.1.131_cpu]: Active CPU1 in % (Load) LegendI[192.168.1.131_cpu]: Active CPU0 in % (Load) LegendO[192.168.1.131_cpu]: Active CPU1 in % (Load) |
您必需特別注意 [192.168.1.131_cpu] 的群組設定,同一個檔案需設為一致才不會出錯。
設定完成後,也是需執行 mrtg 產生網頁與圖像檔案。若有需要,也需要在系統排程裡增加 CPU 的偵測項目。
0001 |
root # LANG=C /usr/local/mrtg/bin/mrtg /application/apps/traffic/mrtg/192.168.1.131-cpu.mrtg.cfg |
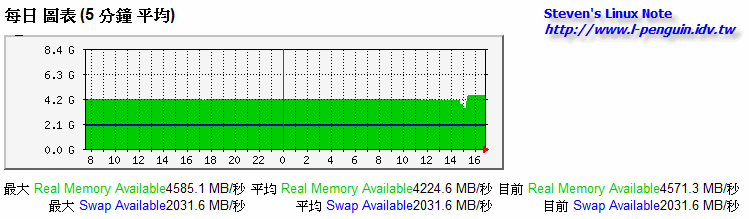
偵測 Memory 使用量
記憶體使用量是在 enterprises 的 OID 之下,如下列範例所示。
0001 0002 0003 0004 0005 0006 0007 0008 0009 0010 0011 0012 0013 0014 0015 0016 0017 |
root # snmpwalk -v 2c -c db3 163.29.3.133 enterprises | grep mem enterprises.ucdavis.memory.memIndex.0 = 0 enterprises.ucdavis.memory.memErrorName.0 = swap enterprises.ucdavis.memory.memTotalSwap.0 = 8388576 enterprises.ucdavis.memory.memAvailSwap.0 = 8388576 enterprises.ucdavis.memory.memTotalReal.0 = 3997440 enterprises.ucdavis.memory.memAvailReal.0 = 128752 enterprises.ucdavis.memory.memTotalFree.0 = 8517328 enterprises.ucdavis.memory.memMinimumSwap.0 = 16000 enterprises.ucdavis.memory.memShared.0 = 0 enterprises.ucdavis.memory.memBuffer.0 = 387472 enterprises.ucdavis.memory.memCached.0 = 3025904 enterprises.ucdavis.memory.memSwapError.0 = 0 enterprises.ucdavis.memory.memSwapErrorMsg.0 = enterprises.8072.1.2.1.1.4.0.8.1.3.6.1.4.1.2021.4.127 = "memory" enterprises.8072.1.2.1.1.4.0.9.1.3.6.1.4.1.2021.4.100.127 = "memSwapError" enterprises.8072.1.2.1.1.4.0.9.1.3.6.1.4.1.2021.4.101.127 = "memSwapErrMsg" |
編輯設定檔案
0001 |
root # vi /application/apps/traffic/mrtg/192.168.1.131-mem.mrtg.cfg |
如前面所提示,您必需修改粗體字以符合環境需求
0001 0002 0003 0004 0005 0006 0007 0008 0009 0010 0011 0012 0013 0014 0015 0016 0017 0018 0019 0020 0021 0022 0023 0024 0025 0026 0027 0028 0029 0030 0031 0032 0033 0034 |
# Created by # /usr/local/mrtg/bin/cfgmaker mail@192.168.1.131 ### Global Config Options # for UNIX # WorkDir: /home/http/mrtg WorkDir: /application/apps/traffic/html # or for NT # WorkDir: c:mrtgdata ### Global Defaults LoadMIBs: /usr/local/net-snmp/share/snmp/mibs/UCD-SNMP-MIB.txt Target[192.168.1.131_mem]:memAvailReal.0&memAvailSwap.0:mail@192.168.1.131 RouterUptime[192.168.1.131_mem]: mail@192.168.1.131 Title[192.168.1.131_mem]: Memory Used MaxBytes[192.168.1.131_mem]: 8388608 Language: big5 WithPeak[192.168.1.131_mem]: wmy kMG[192.168.1.131_mem]: k,M,G Unscaled[192.168.1.131_mem]: ymwd Options[192.168.1.131_mem]: growright,nopercent,gauge #ShortLegend[192.168.1.131_mem]: PageTop[192.168.1.131_mem]: <H1>192.168.1.131 mail Memory Usage (Available) </H1> YLegend[192.168.1.131_mem]: Memory Utilization Legend1[192.168.1.131_mem]: Real Memory Available Legend2[192.168.1.131_mem]: Swap Available LegendI[192.168.1.131_mem]: Real Memory Available LegendO[192.168.1.131_mem]: Swap Available |
執行 mrtg 指令產生檔案。
0001 |
root # LANG=C /usr/local/mrtg/bin/mrtg /application/apps/traffic/mrtg/192.168.1.131-mem.mrtg.cfg |
範例圖示
Memory
CPU
Network traffic
10/21/2008