LDAP - LDAP with TLS/SSL
我在前几篇 LDAP 文件中,介绍与实作了 LDAP 的简单应用,但是 LDAP 传送时是使用明码的方式,也就是说在传送资讯的时间是没有任何的加密,如果在资讯传送的过程中封包被侧录,那么侧录者不用花费任何的力气就可以得知讯息。
在这篇文章中,我会实做如何让 OpenLDAP 使用 SSL 来做传输时的资讯加密,让资讯在传送中加了一层安全防护。
当然了,本次的 LDAP 设计架构完全是使用 LDAP 入门 (new window) 里所实做的架构,可以前往参考。
你可以参考 更安全的的连线 Apache + SSL (new window) 做出一个 LDAP 的凭证,下面的范例中我会建立一个 ldap.l-penguin.ivd.tw.key 的私有金钥。
0001 0002 0003 0004 0005 |
root # openssl genrsa -out ldap.l-penguin.idv.tw.key 1024 Generating RSA private key, 1024 bit long modulus ........................................................................++++++ ......................++++++ e is 65537 (0x10001) |
建立一个 csr 待签证档
0001 0002 0003 0004 0005 0006 0007 0008 0009 0010 0011 0012 0013 0014 0015 0016 0017 0018 0019 0020 0021 |
root # openssl req -new -key ldap.l-penguin.idv.tw.key -out ldap.l-penguin.idv.tw.csr You are about to be asked to enter information that will be incorporated into your certificate request. What you are about to enter is what is called a Distinguished Name or a DN. There are quite a few fields but you can leave some blank For some fields there will be a default value, If you enter '.', the field will be left blank. ----- Country Name (2 letter code) [GB]:TW State or Province Name (full name) [Berkshire]:Taiwan Locality Name (eg, city) [Newbury]:Taipei County Organization Name (eg, company) [My Company Ltd]:l-penguin Corp. Organizational Unit Name (eg, section) []:IT Common Name (eg, your name or your server's hostname) []:ldap.l-penguin.idv.tw Email Address []:steven@l-penguin.idv.tw Please enter the following 'extra' attributes to be sent with your certificate request A challenge password []: An optional company name []: root # |
签证 csr 档案
如果你的单位没有凭证中心,那么可以使用 更安全的的连线 Apache + SSL (new window) 的方式来做自我签证,但如果你的环境中已经有凭证中心(本例中为 ca.l-penguin.idv.tw)那么你可以使用 ca.l-penguin.idv.tw 来帮 ldap.l-penguin.idv.tw 做签证。
若你想建立一个 CA 认证中心,则可以参考 建立一个可信任的单位根签证 (Root CA) (new window)。
0001 0002 0003 0004 0005 0006 0007 |
root # openssl x509 -req -days 365 -in ldap.l-penguin.idv.tw.csr -CA ca.l-penguin.idv.tw.crt -CAkey ca.l-penguin.idv.tw.key -CAcreateserial -out ldap.l-penguin.idv.tw.crt Signature ok subject=/C=TW/ST=Taiwan/L=Taipei County/O=l-penguin Corp./OU=IT/CN=ldap.l-penguin.idv.tw/emailAddress=steven@l-penguin.idv.tw Getting CA Private Key Enter pass phrase for ca.l-penguin.idv.tw.key:your_password root # |
当做好签证之后,在 ldap.l-penguin.idv.tw 上应该要有两个重要的凭证档案。
0001 0002 0003 0004 0005 0006 |
root # ls -l total 12 -rw-r--r-- 1 root root 1017 Feb 21 01:12 ldap.l-penguin.idv.tw.crt -rw-r--r-- 1 root root 737 Feb 21 00:55 ldap.l-penguin.idv.tw.csr -rw-r--r-- 1 root root 887 Feb 21 00:54 ldap.l-penguin.idv.tw.key root # |
做好凭证之后,应该要设定 OpenLDAP 的 slapd.conf 让 OpenLDAP 知道以那些凭证来做 TLS/SSL 的传输。
0001 0002 0003 0004 0005 0006 0007 0008 |
root # vi /etc/openldap/slapd.conf --------------------------------------------------------- TLSCipherSuite HIGH::MEDIUM:LOW # 设定凭证档案 TLSCertificateFile /CA/ldap.l-penguin.idv.tw.crt # 设定私有凭证金钥档案 TLSCertificateKeyFile /CA/ldap.l-penguin.idv.tw.key --------------------------------------------------------- |
重新启动 OpenLDAP
0001 0002 0003 0004 0005 0006 |
root # service ldap restart
Stopping slapd:                                            [  OK  ]
Checking configuration files for slapd:  config file testing succeeded
                                                           [  OK  ]
Starting slapd:                                            [  OK  ]
root # |
确认 OpenLDAP 是否有聆听 636 埠
0001 0002 0003 0004 0005 0006 |
root # netstat -ntulp | grep slapd tcp 0 0 0.0.0.0:389 0.0.0.0:* LISTEN 1737/slapd tcp 0 0 0.0.0.0:636 0.0.0.0:* LISTEN 1737/slapd tcp 0 0 :::389 :::* LISTEN 1737/slapd tcp 0 0 :::636 :::* LISTEN 1737/slapd root # |
以上,就完成了伺服器端的设定。
如果要让 ldapsearch 可以使用 TLS/SSL 来做传输的话,就必需修改 ldap.conf 档案。
0001 0002 0003 0004 0005 |
root # vi /etc/openldap/ldap.conf ------------------------------------- # 加入设定 TLS_REQCERT never ------------------------------------- |
使用 TLS 方式传输
0001 0002 0003 0004 0005 0006 0007 0008 0009 0010 0011 0012 0013 0014 0015 0016 0017 0018 0019 0020 0021 0022 0023 0024 0025 |
root # ldapsearch -x -ZZ -b "ou=company,dc=l-penguin,dc=idv,dc=tw" -h ldap.l-penguin.idv.tw # extended LDIF # # LDAPv3 # base <ou=company,dc=l-penguin,dc=idv,dc=tw> with scope subtree # filter: (objectclass=*) # requesting: ALL # # company, l-penguin.idv.tw dn: ou=company,dc=l-penguin,dc=idv,dc=tw ou: company objectClass: organizationalUnit # unit, company, l-penguin.idv.tw dn: ou=unit,ou=company,dc=l-penguin,dc=idv,dc=tw ou: unit objectClass: organizationalUnit # hr, unit, company, l-penguin.idv.tw dn: ou=hr,ou=unit,ou=company,dc=l-penguin,dc=idv,dc=tw ou: hr objectClass: organizationalUnit ~ 以下略 ~ root # |
使用 SSL 方式传输
0001 0002 0003 0004 0005 0006 0007 0008 0009 0010 0011 0012 0013 0014 0015 0016 0017 0018 0019 0020 0021 0022 0023 0024 0025 |
root # ldapsearch -x -b "ou=company,dc=l-penguin,dc=idv,dc=tw" -H ldaps://ldap.l-penguin.idv.tw # extended LDIF # # LDAPv3 # base <ou=company,dc=l-penguin,dc=idv,dc=tw> with scope subtree # filter: (objectclass=*) # requesting: ALL # # company, l-penguin.idv.tw dn: ou=company,dc=l-penguin,dc=idv,dc=tw ou: company objectClass: organizationalUnit # unit, company, l-penguin.idv.tw dn: ou=unit,ou=company,dc=l-penguin,dc=idv,dc=tw ou: unit objectClass: organizationalUnit # hr, unit, company, l-penguin.idv.tw dn: ou=hr,ou=unit,ou=company,dc=l-penguin,dc=idv,dc=tw ou: hr objectClass: organizationalUnit ~ 以下略 ~ root # |
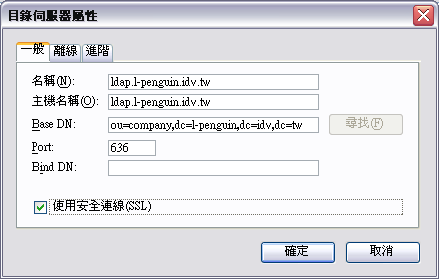
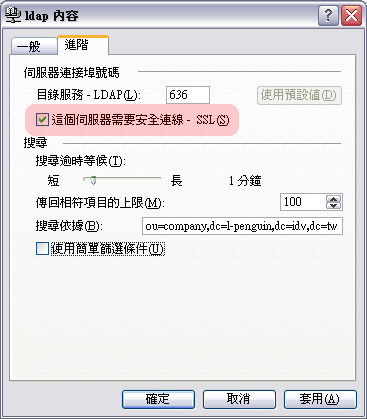
如果你已经把 Root CA 设定为 认证中心,那么就只要做以下设定即可。

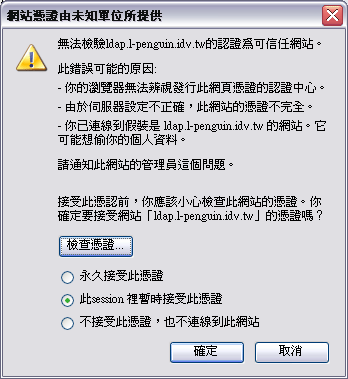
若你的凭证是由自己所签发的,那么就会需要同意传输时的凭证才行。

如果你已经把 Root CA 设定汇入到 Windows 的凭证管理,那么就只要做以下设定即可。

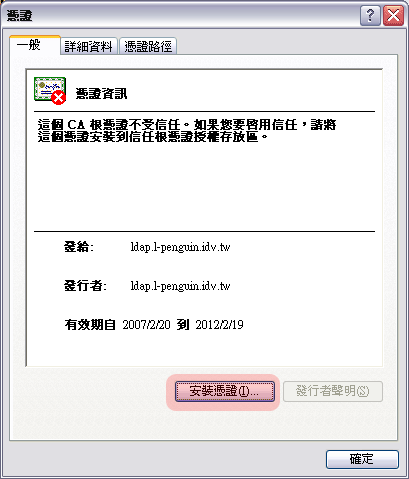
若你的凭证是由自己所签发的,那么就会需要汇入凭证才行。

02/21/2007