Proxy Server - 安装与基本设定
Proxy 基本上来说就是一个代理伺服器,当然如果在对外网路频宽不足的话使用 Proxy 可以有效的舒解网路流量,这篇文章中,小弟会介绍如何建立一个简单的 Proxy Server,其中包含了如何让单位的使用者透过你的 Proxy 连上网页,还有一些简单的设定。
对於这个 Proxy 的单元,小弟会不定期的加入一些应用,当然对於正在服兵役的我,文章的出产时间会有一段时间,若您觉得文章对您或其它网友有帮助,欢迎转贴出去,当然也烦请加注出处。
安装 Squid-Caching Proxy Server
对於 Linux 来说,使用 Squid 这个八角章鱼的套件是最热门的 Caching Server 了,我在这单元里将会介绍如何编译并安装。
下载 squid
你可以到 Squid-Cache 网站上下载最新版本的 squid 套件,在台湾地区则可以选择 Squid-Cache 的 mirror 站台。在本文完成时,最新版本的 squid 稳定版本是 2.6。
0001 0002 0003 0004 |
root # wget http://www2.tw.squid-cache.org/Versions/v2/2.6/squid-2.6.STABLE3.tar.bz2 root # tar -jxvf squid-2.6.STABLE3.tar.bz2 root # ./configure --prefix=/usr/local/squid --enable-gnuregex --enable-async-io=80 --enable-kill-parent-hack --enable-snmp --disable-ident-lookups --enable-cahce-digests --enable-poll --enable-linux-netfilter root # make |
安装 squid
经过以上的动作之后会把 squid 编译完成,请执行 make install 完成安装。
0001 |
root # make install |
设定 Squid
最简单的设定
squid 的设定档是在 /usr/local/squid/etc/squid.conf 这个档案
0001 0002 0003 0004 0005 0006 0007 0008 0009 |
root # vi squid.conf --------------------------------------------------------------------- # 设定 http 的 port http_port 3128 # 设定暂存档的路径 cache_dir ufs /usr/local/squid/var/cache 100 16 256 # 设定 squid 是由 nobody 的身份启动 cache_effective_user nobody --------------------------------------------------------------------- |
建立暂存目录
0001 0002 |
root # mkdir -p /usr/local/squid/var/cache root # chown -Rf nobody /usr/local/squid |
第一次启动 squid ...
当你第一次启动 squid 时,因为在暂存目录的 cache spool 都还没有建立起来,所以必需要把这些目录都建立起来之后才可以正常使用 squid。
0001 |
root # /usr/local/squid/sbin/squid -z |
当你执行完上面的指令之后,可以看到 /usr/local/squid/var/cache 多了很多目录
0001 0002 0003 |
root # ls /usr/local/squid/var/cache 00 01 02 03 04 05 06 07 08 09 0A 0B 0C 0D 0E 0F root # |
现在你可以真的开始使用 squid 了。
若要执行 squid,可以使用 RunCache 这个 shell script 可以很简单的启动:
0001 0002 0003 |
root # netstat -ntulp | grep 3128 tcp 0 0 0.0.0.0:3128 0.0.0.0:* LISTEN 2998/squid root # |
查看 squid 是否正在执行
0001 |
root # /usr/local/bin/RunCache & |
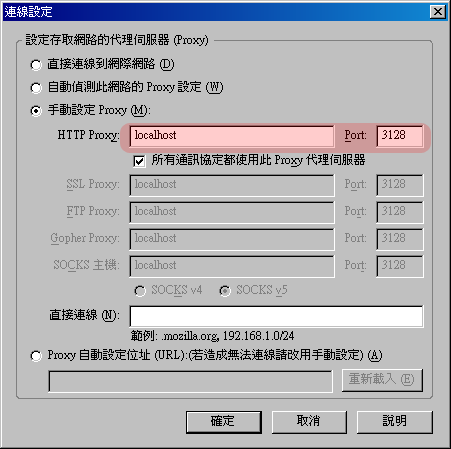
设定 Browser 透过 Proxy 开启网页
以下为 Firefox 的设定,若是 IE 的画请比照参考。
现在你应该可以使用 proxy 上网了!
设定使用者也可以透过你的 Proxy 上网
当你在你的 Client 设定好 proxy 之后,有可能会发现会出现类似以下画面。
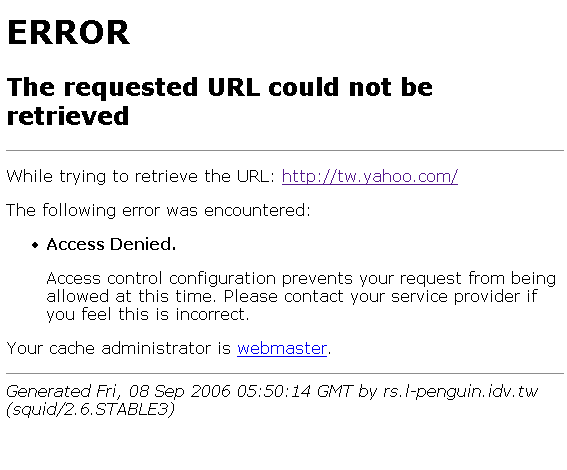
这表示你的 squid 不允许你的 Client 透过 Proxy 存取网页,所以现在我们就来加入一个条件可以帮内部的 Client 做代理。
设定 squid.conf
0001 0002 0003 0004 0005 0006 0007 |
root # vi /usr/local/etc/squid.conf --------------------------------------------------------------------- # 建立一个 acl 为 l-penguin acl l-penguin src 192.168.1.0/24 # 设定 l-penguin 可以使用 http 存取 http_access allow l-penguin --------------------------------------------------------------------- |
现在在来看看是否可以浏览网页!
0001 0002 |
root # kill 2998 root # /usr/local/bin/RunCache & |

09/08/2006