Gluster - Distributed-Replicated 模式
Distributed 讓檔案分散於多個 Brick 進而增加檔案存的效率而且容易擴充、Replicated 則是讓檔案能有多一份的保障,Gluster Storage 允許您將這兩個模式的優點整合在一起,讓儲存系統提供同時擁有效能、容易擴充而且又有複寫功能的好處。
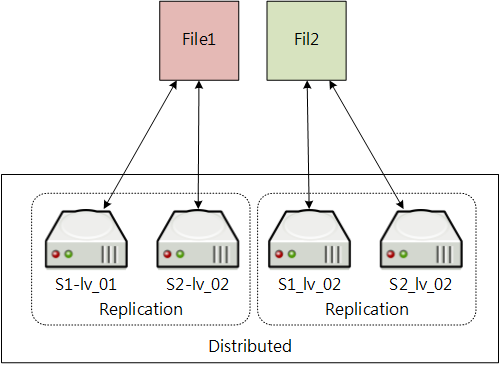
在 Distributed-Replicated 模式中,File1 與 File2 在寫入的時候其實是會先被分開,然後再寫入相對應的 Replicated Brick 中。

特徵討論
資料分配
Distributed-Replicated 模式的資料分配方式為 Distributed 優先,Replicated 其後,也就是說當有檔案寫入的時候,會先計算合適的 Brick 位置,然後同時也會複寫一份到另一個相對應的 Brick。
當檔案被讀取時,會先計算檔案位置,再從 Replicated 中最快回應的 Brick 取得檔案。
效能
以資料分配來看,寫入的部份因為 Replicated 的關係會被打折,假如有 1GiB 的網路環境,加上 2 個 Node 實做 Distributed-Replicated 模式的架構下,其寫入效能會是 2 100 / 2 = 100MB,而讀取速度為 2 100 = 200MB。
越多的節點伺服器,其讀取的效能則越大,而寫入速度為整體數的一半。
檔案存取流程
Distributed-Replicated 模式的檔案存取流程如下:
Native Client:
Native Client 先向正確的 Distributed 群組查看相對應 Replicated 成員,再從成員中回應最快的 Brick 取得檔案。檔案寫入時則時直接寫入正確的 Distributed 中所有 Replicated 成員。
NFS:
NFS Client 可以掛載到 Storage Spool 中的任何一個節點,所有檔案的存取都是由被掛載的節點處理完之後再回傳給 NFS Client,而該節點的檔案寫入與讀取流程就像 Native Client 一樣。
節點 / Brick 損毀
在一個 Distributed-Replicated 系統中,所屬 Replicated 的 Brick 成員不在同一個節點中,在 Distributed 群組下允許損毀 1 個節點。
舉例來說,一個 Volume 共有六個節點組合成 3 個 Distributed 群組,每個群組 Replicated 數量為 2,那麼每個群組允許 1 個節點損毀,則整個 Volume 就算是 3 個節點同時發生異常也可以運作。
當您的節點還原或是重新加入新的節點時,新的節點會被重新完成複寫作業以保持架構的完整。
容量
Distributed-Replicated 整體容量為 n / 2(n 為全部容量總合),也就是說當節點數為 6 個 100GB,則整體容量為 100GB * 6 / 2 = 300GB。
開始設定 volume
Gluster Volume 設定
設定 Distributed-Replicated 模式時需要較多的 Brick,通常為 2(replica = 2)的倍數,如 2、4、6⋯⋯等數量。
設定時會依 Brick 指定的順序先滿足 Replicated 的需求,然後把每一組 Replicated 做 Distributed 分散存取,所以當您的 Replicated 數量不只為 2 時,則要注意所有的 Brick 數量要等於 replica 指定的倍數。
本案例中設定 distrepl_vol 的 brick 順序如下:
- gfs-01:/bricks/distrepl_vol/brick/
- gfs-03:/bricks/distrepl_vol/brick/
- gfs-05:/bricks/distrepl_vol/brick/
- gfs-02:/bricks/distrepl_vol/brick/
- gfs-04:/bricks/distrepl_vol/brick/
- gfs-06:/bricks/distrepl_vol/brick/
所以 gfs-01、gfs-03 一組;gfs-05,gfs-02 一組;gfs-04、gfs-06 為一組,總共可分配為 4 組做為 Distributed。
建立 Volume
 root # gluster volume create distrepl_vol replica 2 \
 > gfs-01:/bricks/distrepl_vol/brick/ \
 > gfs-03:/bricks/distrepl_vol/brick/ \
 > gfs-05:/bricks/distrepl_vol/brick/ \
 > gfs-02:/bricks/distrepl_vol/brick/ \
 > gfs-04:/bricks/distrepl_vol/brick/ \
 > gfs-06:/bricks/distrepl_vol/brick/
如果在這個過程發生錯誤,請確認節點是否存在、目錄是確正確與節點是否已被加入 Storage Pool
啟用 Volume
root # gluster volume start distrepl_vol查看 Volume 狀態
root # gluster volume info distrepl_vol
經過以上三個步驟就完成了 volume 的設定,非常簡短。
Client 存取設定
在 Red Hat Enterprise Linux 與 CentOS 下,可以使用 Native Client 直接與 Volume 連接,或是使用 NFS 掛載。
Native Client:
在使用 Native Client 之前要先確認已經安裝了
glusterfs-fuse的 RPM 套件,而連接 Volume 的方法就跟掛載磁碟一樣簡單:root # mount -t glusterfs rw gfs-01:/distrepl_vol /mnt/distrepl_vol上述指令會將 gfs-01 的 Volume(dist_vol)掛載到 /mnt/repl_vol,在掛載的同時 gfs-01 也會傳送相關的 brick 資訊給 Client。
如果要在開機的時候就掛載該 volume,那麼就需要在
/etc/fstab中設定(該設定會啟用 ACL 功能):gfs-01:/distrepl_vol /mnt/distrepl_vol glusterfs _netdev,rw,acl 0 0NFS:
NFS 掛載的方法就如同以往一樣沒有改變:
root # mount -t nfs rw gfs-01:/distrepl_vol /mnt/distrepl_vol若要在開機時啟用則設定
/etc/fstabS1:/dist_vol /mnt/distrepl_vol nfs rw 0 0
更換 Brick
通常建置完成好之後就很少會再更動設備,除非遇到設備更新或是損毀後的修複。不管任何原因,Gluster 都允許你進行線上更換 Brick,也就是在更換 Brick 的時候不用讓你的服務停止,而且使用者可以繼續操作檔案。
只要 Brick 有所變動,基本上就會在更換的時候耗用較大的 CPU 與網路流量,因為 Gluster 要把資料從來源端複製到新的 Brick 上,但時間與資源消耗要看資料量的大小來決定。Brick 變更的時候雖然不會影響使用者的操作,但是會增加些許的延遲時間,感覺得來就會覺得像時存取效能變慢,但在 Brick 轉換完成之後一切就會恢複正常。
Brick 在更換的過程中,是由 Server 端的主機做資料移轉而不是 Client,所以在整個後端資料流與網路會較為忙碌。
更換 Brick 可以使用 replace-brick 完成,其整體的語法如下:
root # gluster volume replace-brick [VOL_NAME] [OLD_BRICK] [NEW_BRICK] [start | status | commit]
直接替換 Brick
更換 Brick 前請先確定所屬節點已被加入 Storage Pool。
假設在名稱為 distrepl_vol 的 Volume 我們使用 gfs-07:/bricks/distrepl_vol/brick/ 替換 gfs-01:/bricks/distrepl_vol/brick/,那麼實做的方法如下:
設定替換作業
 root # glsuter volume replace-brick distrepl_vol \
 gfs-01:/bricks/distrepl_vol/brick/ \
 gfs-07:/bricks/distrepl_vol/brick/ \
 start
查看 Brick 檔案移動狀態
 root # glsuter volume replace-brick distrepl_vol \
 gfs-01:/bricks/distrepl_vol/brick/ \
 gfs-07:/bricks/distrepl_vol/brick/ \
 status
 volume replace-brick: success: Number of files migrated = 1     Migration complete
通知 Volume 確認移除舊的 Brick
 root # glsuter volume replace-brick distrepl_vol \
 gfs-01:/bricks/distrepl_vol/brick/ \
 gfs-07:/bricks/distrepl_vol/brick/ \
 commit
請使用
status確認所有的檔案已經在完成(complete)狀態再進行commit。確認 volume 成員
root # gluster volume info distrepl_vol
新增 Brick
先前討論若只是在單純的 Replicated Volume 無法新增 Replicated 是因為若再繼續增加 Brick,那麼該 Volume 就會直接轉換為 Distributed-Replicated 模式。
若要在 Distributed-Replicated 模式增加 Brick 的話,則必需是 Replicated 數量的倍數。以本例來說因為 replica 設定為 2,所以爾後再新增 Brick 時就要新增為 2 的倍數。
假設要再新增 gfs-09:/bricks/distrepl_vol/brick/ 與 gfs-10:/bricks/distrepl_vol/brick/ 到 distrepl_vol 中,則執行下列流程:
新增 Brick
 root # glsuter volume add-brick distrepl_vol \
 > gfs-09:/bricks/distrepl_vol/brick/ \
 > gfs-10:/bricks/distrepl_vol/brick/
接著,因為 Distributed 的數量改變,所以要將實體檔案位置重新分配:
root # gluster volume rebalance distrepl_vol start